

MicroProfile 6.1 Tutorial
MicroProfile Tutorial
Version: 6.1 · Status: Draft
Legal
Copyright (c) 2024 Contributors to the Eclipse Foundation. Licensed under the Apache License, Version 2.0.
Preface
About this Tutorial
In this tutorial, you will learn how to use the features of the MicroProfile Platform by building a microservices-based e-commerce application named "MicroProfile e-Commerce". The tutorial will cover using MicroProfile APIs such as Config, REST Client, JWT, Fault Tolerance, and Metrics to build efficient, scalable, and resilient microservices for cloud-native applications.
Who is this Tutorial for
This tutorial caters to software professionals, from beginners to senior developers, engineering managers, and architects, to adeptly utilize MicroProfile in real-world projects.
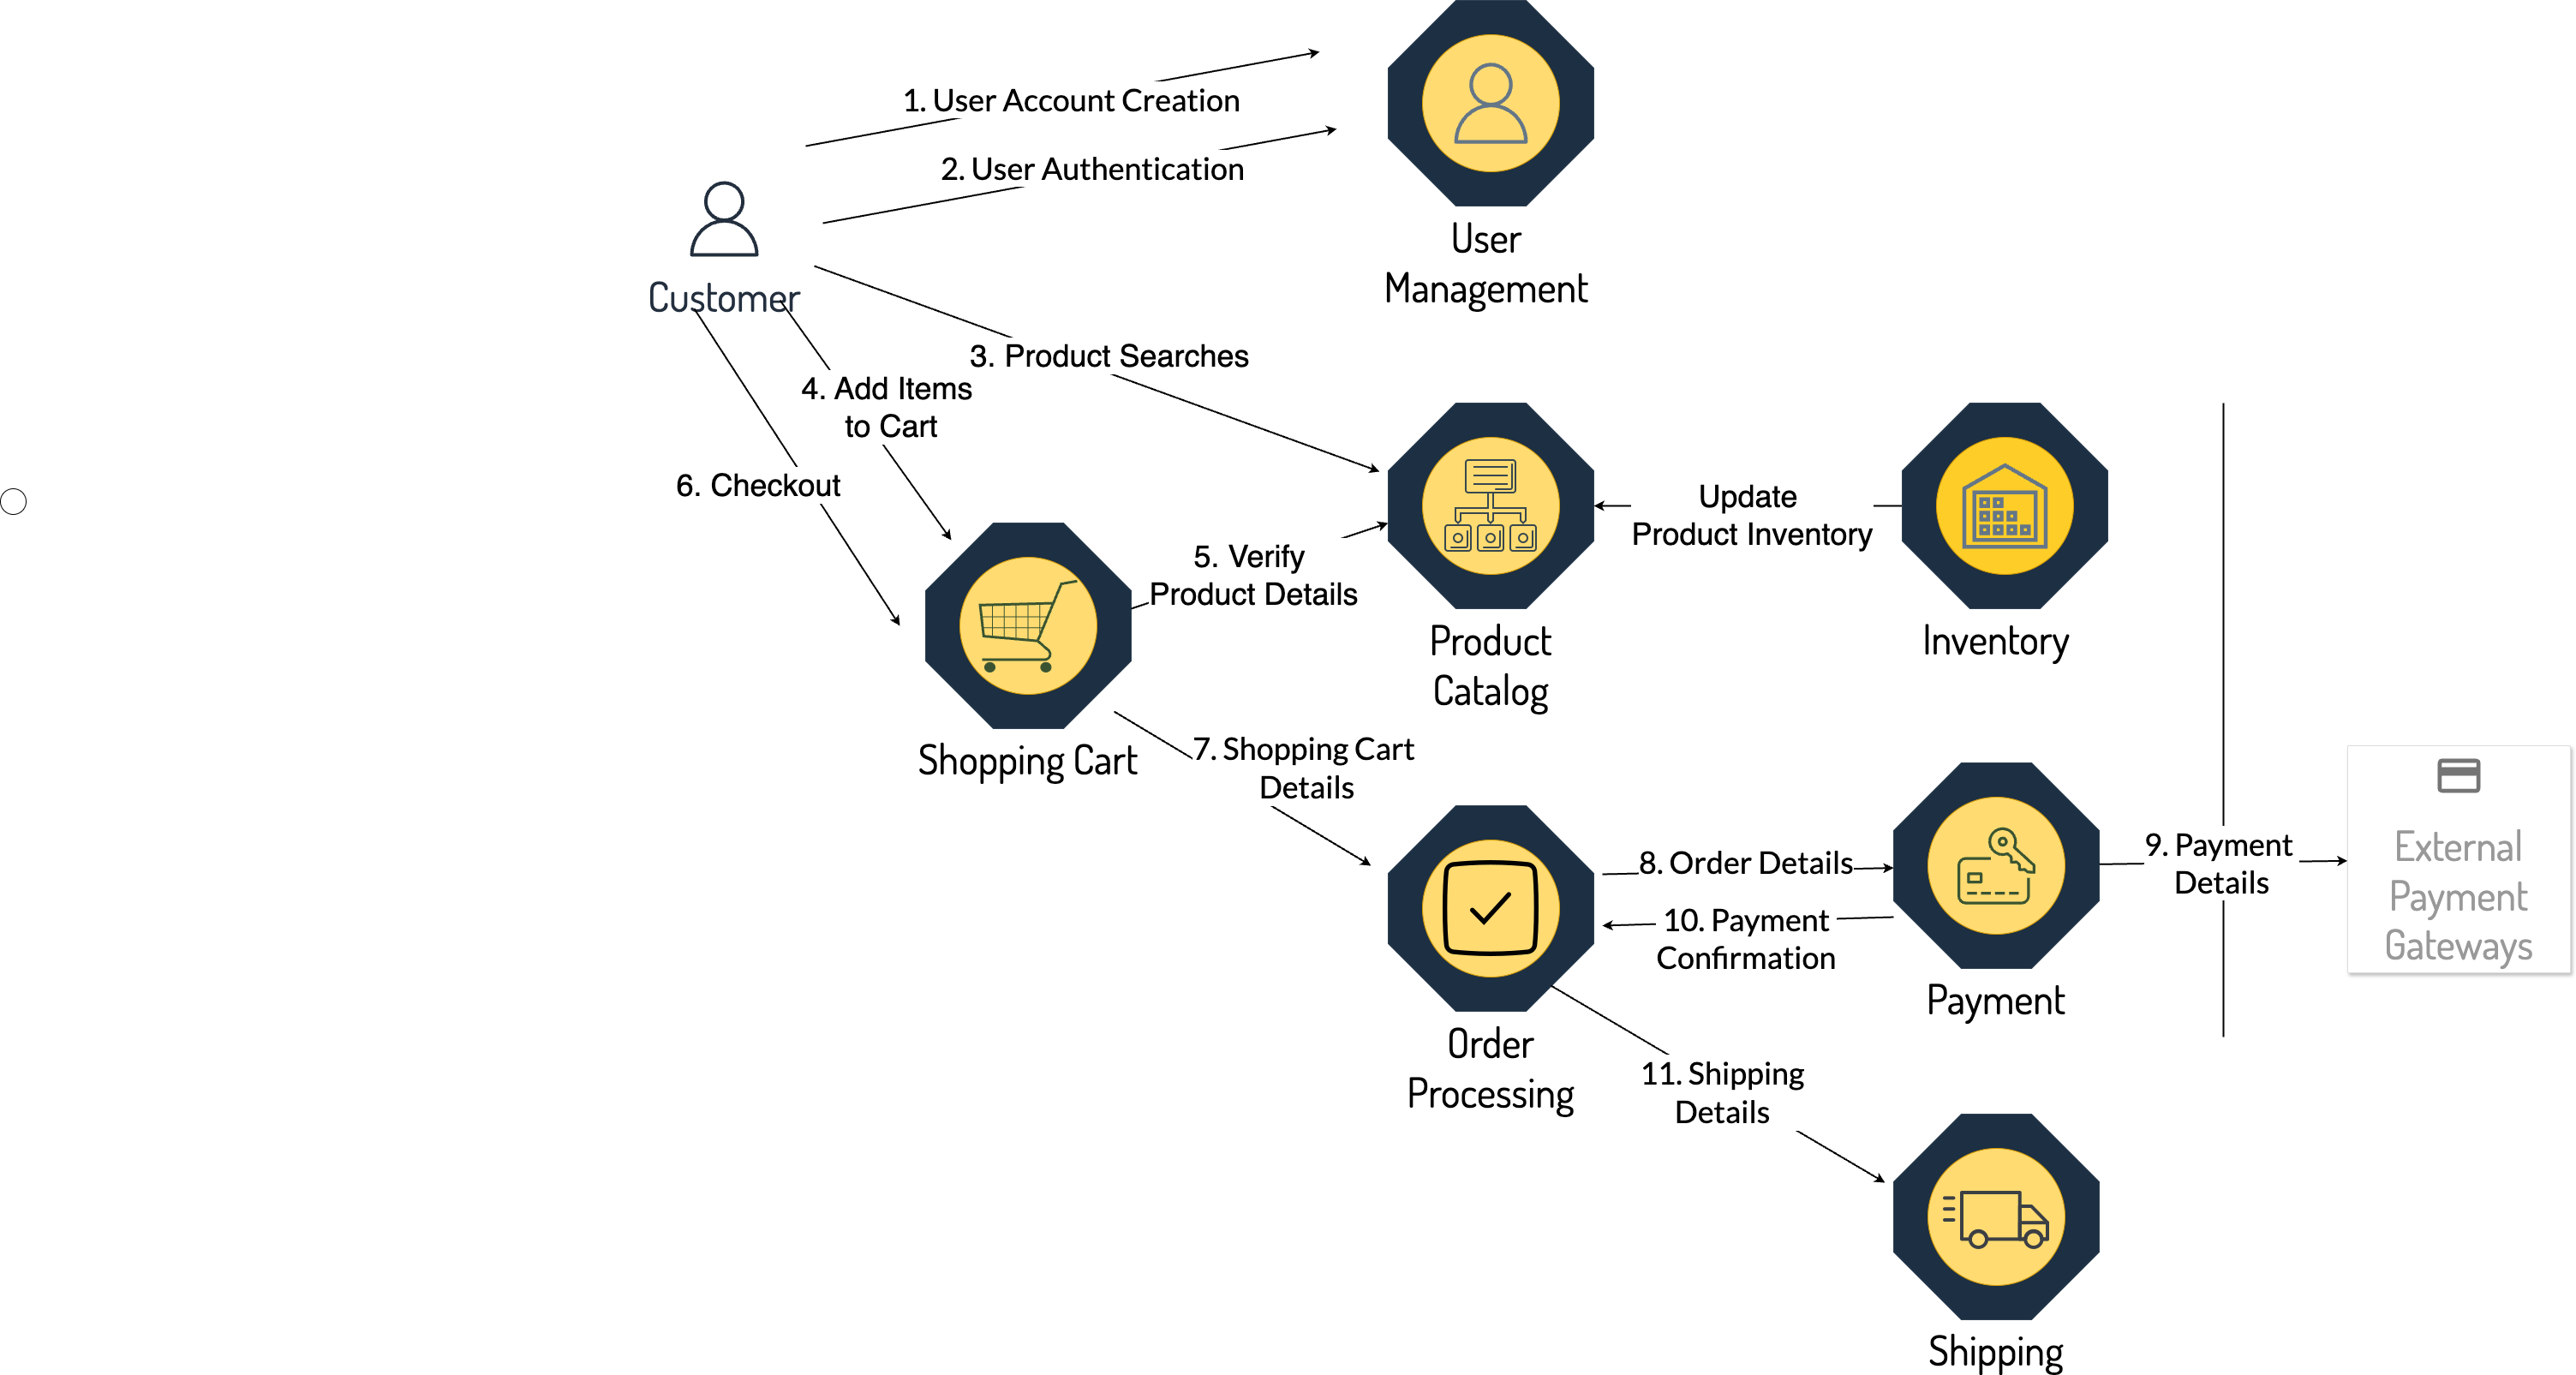
The MicroProfile e-Commerce Application
The app demonstrates MicroProfile APIs for developing an application based on microservices and cloud-native architecture. Key microservices include:
- Product Catalog — Central repository for all product-related information.
- Shopping Cart — Allows users to add or remove products; communicates with Product Catalog.
- User Management — Handles registration, login, and account updates securely using JWT tokens.
- Order Processing — Manages the entire order process from shipping info to payment.
- Payment — Processes payments via external payment gateways.
- Inventory — Monitors and manages inventory levels in real-time.
- Shipping — Manages logistics of order delivery.
Downloading the Code
Code examples are available at github.com/eclipse/microprofile-tutorial.
Prerequisites
A basic understanding of Java and RESTful Web Services is assumed. See dev.java/learn for Java resources.
Learning Objectives
- Gain a solid understanding of MicroProfile and its role in cloud-native application development
- Learn hands-on experience with Config, Health, Metrics, JWT Authentication, Fault Tolerance, Rest Client
- Master techniques for developing resilient services using fault tolerance and health checks
- Learn how to secure microservices using MicroProfile JWT
- Implement monitoring strategies using MicroProfile Metrics
- Learn to trace microservice interactions with OpenTelemetry for enhanced observability
Conventions
| Convention | Meaning | Example |
|---|---|---|
| Boldface | Term defined in text or GUI element | A cache is a copy stored locally. |
Monospace |
Files, directories, commands, URLs, code | Edit your .login file. Use ls -a. |
| Italic | Book titles, emphasis, placeholder variables | Read User's Guide. The rm filename command. |
Introduction to MicroProfile
Introduction
This introductory chapter provides a comprehensive overview of the MicroProfile platform. It aims to familiarize you with the fundamentals of MicroProfile, its need, and benefits—and its place in the broader context of enterprise Java development.
Topics to be covered
- What is MicroProfile
- Need for MicroProfile
- MicroProfile Specifications
- Current MicroProfile Implementations
- Architecture Philosophy
- Benefits of MicroProfile
- Relationship with Jakarta EE specification
What is MicroProfile
MicroProfile is an open-source specification that enhances enterprise Java technologies for microservices development. It provides a set of APIs and specifications for building modern, scalable, resilient, and efficient microservices-based applications. The primary goal is to simplify development for Java developers, enabling them to create applications optimized for cloud-native development.
MicroProfile was initiated in June 2016 by a collaboration of industry leaders and community members. The project was then transitioned to the Eclipse Foundation to enhance openness and vendor-neutral stance.
The MicroProfile Working Group currently comprises:
Corporate Members: IBM, Fujitsu, Red Hat, Primeton, Payara, Microsoft, Tomitribe, Oracle
Java User Groups: Atlanta Java User Group (AJUG), Association of the German Java User Groups (iJUG)
Need for MicroProfile
The specification was developed to address the following requirements:
- Microservices Architecture Adoption — Provides a simplified and optimized set of APIs for Java-based microservices.
- Limitations of Traditional Enterprise Java — Fills the gap left by heavyweight Java EE frameworks.
- Cloud-Native Application Development — Bridges gaps left by existing Java standards for cloud environments.
- Community-Driven Innovation — Backed by community and vendor support, promotes rapid evolution.
- Vendor Neutrality and Interoperability — Ensures standardization across implementations, avoiding vendor lock-in.
- Focus on Simplicity and Productivity — Reduces boilerplate code and focuses on essential microservice functionality.
- Support for familiar programming model — Built on Jakarta JSON Processing, JSON Binding, RESTful Web Services, and CDI.
- Rapid Adaptation to New Trends — Evolves quickly to incorporate Streaming APIs, API-First Development, and Eventual Consistency.
MicroProfile Specifications
MicroProfile specifications are divided into two main categories: Platform and Standalone.

Figure 1. MicroProfile 6.1 Specifications
Platform Component Specifications
| Specification | Description |
|---|---|
| Config | Easy-to-use and flexible system for application configuration. |
| Fault Tolerance | Implements Circuit Breaker, Bulkhead, Retry, Timeout, and Fallback patterns. |
| JWT Authentication | Uses OpenID Connect (OIDC) based JSON Web Tokens for role-based access control. |
| Metrics | Define custom application metrics and expose them on a standard endpoint. |
| Health | Allows applications to expose their health and readiness to the underlying platform. |
| Open API | Facilitates generation of OpenAPI documentation for RESTful services. |
| Telemetry | Provides APIs for collecting, processing, and exporting telemetry data. |
| Rest Client | Type-safe approach to invoke RESTful services over HTTP(S). |
| Jakarta EE Core Profile 10 | Optimized Jakarta EE platform for microservices with reduced specifications. |
Standalone (Outside Umbrella) Specifications
| Specification | Description |
|---|---|
| Context Propagation | Propagates context between threads and managed executor services. |
| GraphQL | Provides a layer on top of Jakarta EE for creating GraphQL services. |
| Long Running Actions (LRA) | Model for services participating in long-running distributed processes. |
| Reactive Messaging | Facilitates building event-driven, responsive, and resilient microservices. |
| Reactive Streams Operators | Processes data streams in a reactive, non-blocking manner. |
| Open Tracing | Integrates distributed tracing by tracking requests across service boundaries. |
MicroProfile Implementations
Architecture Philosophy
The overall goal of MicroProfile architecture is to provide a lightweight enterprise-grade framework for building cloud-native applications:
- Simplicity — APIs are designed to be simple and easy to use, avoiding unnecessary complexity.
- Modularity — Its modular approach allows developers to use only what they need.
- Standards-based — Based on open standards ensuring compatibility and consistency.
- Community-driven — Encourages active participation from the Java community.
- Vendor-Neutral — Supported by several industry players ensuring no single company controls its direction.
- Focus on Cloud-Native Applications — Integrates with Kubernetes and Istio for cloud deployments.
- Reactive programming — Supports reactive programming for responsive and scalable services.
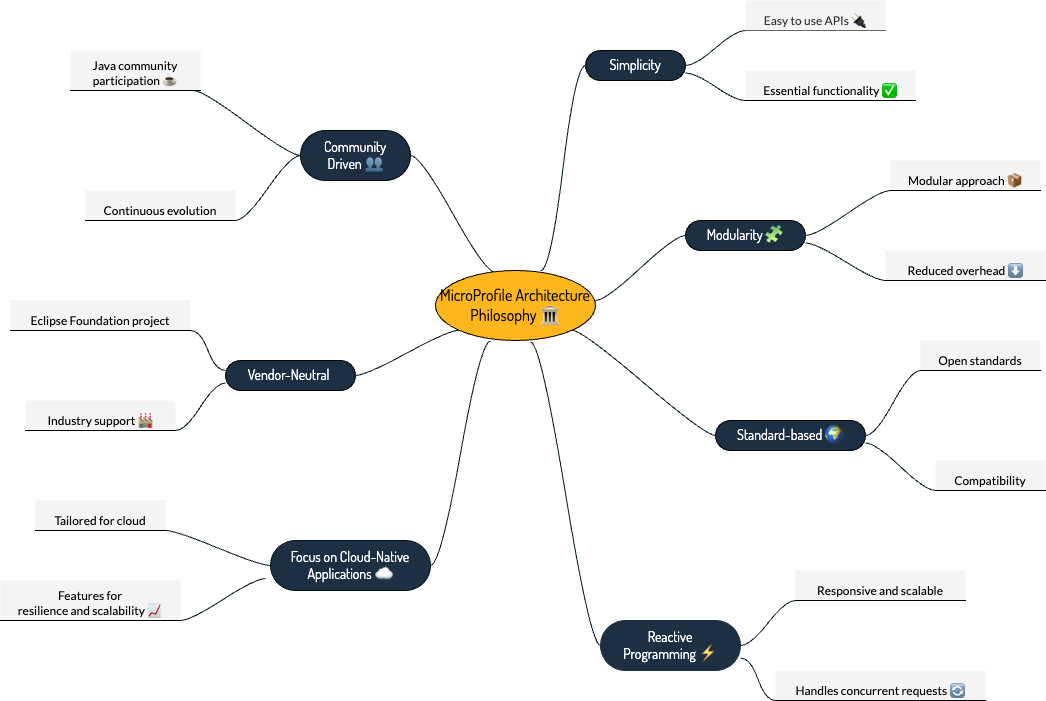
Figure 2. Architecture Philosophy of MicroProfile
Benefits of MicroProfile
- Optimized for Microservices — Designed explicitly for creating microservices.
- Cloud-Native Focus — Includes externalized configuration, health checks, and metrics.
- Open Source and Standards-Based — Facilitates interoperability and reduces vendor lock-in.
- Enhanced Productivity — Simplifies microservices development by reducing boilerplate code.
- Community-Driven Innovation — Evolves quickly, incorporating new trends and best practices.
- Lightweight and Modular — Smaller footprint than traditional enterprise Java frameworks.
- Scalability — Supports development of scalable applications.
- Enhanced Resilience — Fault tolerance patterns: retries, circuit breakers, timeouts, bulkheads.
- Security Features — JWT Authentication provides a standardized way to secure microservices.
- Ease of Testing — Lightweight nature simplifies testing in isolation and integration scenarios.
Relationship with Jakarta EE
Jakarta EE is an open specification with more than 40 component specifications. MicroProfile complements this by providing a baseline platform definition that optimizes enterprise Java for microservices architecture and delivers application portability across multiple compatible runtimes.
MicroProfile and Jakarta EE are complementary technologies. Both platforms enable developers to stay at the forefront of cloud-native application development.
Conclusion
We explored the MicroProfile platform in detail, laying the foundation for understanding how it revolutionizes microservices development using Java. We covered essential specifications and how they address specific challenges in microservices development. In upcoming chapters, we will delve deeper into each specification.
Getting Started with MicroProfile
Introduction
In this chapter, you'll embark on your MicroProfile journey. We will guide you through creating your first microservice, starting with setting up your development environment, then diving into creating a microservice.
Topics Covered
- Development Environment Setup
- Configuring Build Tools
- Initializing a New MicroProfile Project
- Choosing Right Modules for your Application
- Building a RESTful service
- Deployment and Testing
Development Environment Setup
Java Development Kit (JDK)
MicroProfile runs on the JVM, making the JDK an essential component.
- Download — Visit OpenJDK and download the version compatible with your OS.
- Install — Follow the OpenJDK Installation guide.
- Verify — Run the following command:
java -version
Expected output:
openjdk 17.0.10 2024-01-16 LTS
OpenJDK Runtime Environment Microsoft-8902769 (build 17.0.10+7-LTS)
OpenJDK 64-Bit Server VM Microsoft-8902769 (build 17.0.10+7-LTS, mixed mode, sharing)
For most MicroProfile implementations, JDK 11 or later is recommended. This tutorial uses JDK 17.
Build Tools (Maven or Gradle)
- Apache Maven — Convention-over-configuration approach with extensive plugin repository.
- Gradle — Flexible, script-based build configuration with superior performance due to incremental builds.
Installing Apache Maven
mvn -v
Expected output:
Apache Maven 3.9.6
Maven home: /usr/local/sdkman/candidates/maven/current
Java version: 17.0.10, vendor: Microsoft
Installing Gradle
gradle -version
Expected output:
Gradle 8.6
Kotlin:  1.9.20
JVM:     17.0.10 (Microsoft 17.0.10+7-LTS)
Integrated Development Environments
Popular IDEs for MicroProfile development:
- Eclipse for Enterprise Java — Extensive support for Java EE, Jakarta EE, and MicroProfile.
- IntelliJ IDEA — Supports Java, Kotlin, Spring, Jakarta EE, and MicroProfile.
- Apache NetBeans — Open-source IDE supporting Java development.
- Visual Studio Code — Lightweight editor with Java support through extensions.
Setting up MicroProfile Runtime
Open Liberty
Open Liberty is a flexible server framework from IBM. Known for dynamic updates and lightweight design.
# Download and unzip from https://openliberty.io/start/
# Run the server
./bin/server start defaultServer
Quarkus
Quarkus offers fast startup times and low memory footprint, optimized for Kubernetes.
# Create a new Quarkus project
mvn io.quarkus.platform:quarkus-maven-plugin:create \
  -DprojectGroupId=io.microprofile.tutorial \
  -DprojectArtifactId=mp-ecomm-store
Payara Micro
Payara Micro is a lightweight middleware platform suited for containerized applications.
WildFly
WildFly provides full Jakarta EE and MicroProfile support, designed for scalability and flexibility.
Helidon
Helidon MP implements MicroProfile specifications and provides a familiar programming model for Jakarta EE developers.
Apache TomEE
Apache TomEE integrates Apache Tomcat with Jakarta EE and MicroProfile support.
MicroProfile Starter
Generate your project at start.microprofile.io:
- Provide a
groupId(e.g.,io.microprofile) andartifactId(e.g.,mp-ecomm-store) - Select your Java SE version and MicroProfile version
- Select the specifications you want to include
- Click Download and import into your IDE
At the time of writing, the latest released version was 6.1. The MicroProfile Starter may not support this version yet; check the site for the most current options.
Jakarta EE 10 Core Profile
Introduction
This chapter delves into the Jakarta EE 10 Core Profile, a specification designed specifically for microservices and cloud-native apps. In this chapter, we will explore the critical features of Jakarta EE 10 Core Profile, including CDI, Jakarta REST, JSON Binding, and JSON Processing.
Topics to be covered
- Understanding the Jakarta EE 10 Core Profile
- Key Specifications in Core Profile
- Managing Component Dependencies
- Handling HTTP Methods and Resources
- Defining RESTful APIs
Understanding the Jakarta EE 10 Core Profile
The Jakarta EE 10 Core Profile is a streamlined subset of the full Jakarta EE platform explicitly designed for building lightweight microservices and cloud-native applications. It provides a standardized foundation comprising a curated selection of specifications:
- Jakarta Annotations — Decorate code with metadata to influence system configuration and behavior.
- Jakarta Contexts and Dependency Injection Lite — Manages lifecycle contexts of stateful components and dependency injection.
- Jakarta Interceptors — Intercepts business method invocations for cross-cutting concerns like logging.
- Jakarta JSON Processing and JSON Binding — Simplifies parsing, generation, and binding of JSON data.
- Jakarta REST — Framework for creating RESTful web services.
Key Specifications in Core Profile
Jakarta Annotations
Key features: - Simplification of Configuration — Reduces the need for XML configuration files. - Enhanced Readability — Configuration is co-located with the code it configures. - Wide Adoption — Used across the Jakarta EE platform for dependency injection and REST endpoints.
Jakarta CDI - CDI Lite
Key features: - Type-safe Dependency Injection — Reduces runtime errors and improves developer productivity. - Contextual Lifecycle Management — Manages bean lifecycle according to well-defined contexts. - Interceptors — Supports non-invasive way to add behavior to beans.
The CDI Lite Tutorial is an invaluable resource for learning CDI Lite in detail.
Jakarta JSON Processing (JSON-P)
Key features:
- Parsing and Generation — Parse and generate JSON using streaming API or object model API.
- Object Model API — DOM-like tree structure for building and manipulating JSON data.
- Streaming API — High-efficiency JsonParser and JsonGenerator for processing large JSON data.
Jakarta JSON Binding (JSON-B)
Key features: - Automatic Binding — Bind Java objects to JSON and vice versa without manual parsing. - Customization — Annotations to customize serialization and deserialization processes. - Support for Java Generics — Handles complex objects including those using Java Generics.
Jakarta RESTful Web Services
Key features:
- Annotation-driven Development — @Path, @GET, @POST, @Produces, @Consumes.
- Flexible Data Format Support — JSON, XML, and more.
- Client API — Creates HTTP requests to RESTful services.
Managing Component Dependencies
Entity class
package io.microprofile.tutorial.store.product.entity;

import jakarta.persistence.Entity;
import jakarta.persistence.Id;
import jakarta.persistence.GeneratedValue;
import jakarta.persistence.GenerationType;
import jakarta.validation.constraints.NotNull;

@Entity
@Table(name = "Product")
@NamedQuery(name = "Product.findAllProducts", query = "SELECT p FROM Product p")
@Data
@AllArgsConstructor
@NoArgsConstructor
public class Product {

    @Id
    @GeneratedValue(strategy = GenerationType.IDENTITY)
    private Long id;

    @NotNull
    private String name;

    @NotNull
    private String description;

    @NotNull
    private Double price;
}
Repository class
@RequestScoped
public class ProductRepository {

   @PersistenceContext(unitName = "product-unit")
   private EntityManager em;

   public void createProduct(Product product) { em.persist(product); }

   public Product updateProduct(Product product) { return em.merge(product); }

   public void deleteProduct(Product product) { em.remove(product); }

   public List<Product> findAllProducts() {
       return em.createNamedQuery("Product.findAllProducts", Product.class).getResultList();
   }

   public Product findProductById(Long id) {
       return em.find(Product.class, id);
   }
}
Handling HTTP Methods and Resources
@Path("/products")
@ApplicationScoped
public class ProductResource {

    @Inject
    private ProductRepository productRepository;

    @GET
    @Produces(MediaType.APPLICATION_JSON)
    public Response getAllProducts() {
        return Response.ok(productRepository.findAllProducts()).build();
    }
}
The @ApplicationScoped annotation specifies that there will be a single instance of ProductResource for the entire application.
Defining RESTful APIs
REST API operations for the products resource:
| Method | Path | Description |
|---|---|---|
| GET | /api/products |
Retrieves a list of products |
| POST | /api/products |
Creates a new product |
| PUT | /api/products |
Updates an existing product |
| DELETE | /api/products/{id} |
Deletes a product by ID |
Creating a Product
@POST
@Consumes(MediaType.APPLICATION_JSON)
@Transactional
public Response createProduct(Product product) {
   productRepository.createProduct(product);
   return Response.status(Response.Status.CREATED).entity("New product created").build();
}
Verify with cURL:
curl -H 'Content-Type: application/json' \
  -d '{"id":"3","name":"iPhone 14","description":"Apple iPhone 14","price":"799.99"}' \
  -X POST http://localhost:9080/mp-ecomm-store/api/products
Updating a Product
@PUT
@Consumes(MediaType.APPLICATION_JSON)
@Transactional
public Response updateProduct(Product product) {
   Product updatedProduct = productRepository.updateProduct(product);
   if (updatedProduct != null) {
       return Response.status(Response.Status.OK).entity("Product updated").build();
   } else {
       return Response.status(Response.Status.NOT_FOUND).entity("Product not found").build();
   }
}
Deleting a Product
@DELETE
@Transactional
@Path("products/{id}")
public Response deleteProduct(@PathParam("id") Long id) {
     Product product = productRepository.findProductById(id);
     if (product != null) {
         productRepository.deleteProduct(product);
         return Response.status(Response.Status.OK).entity("Product deleted").build();
     } else {
        return Response.status(Response.Status.NOT_FOUND).entity("Product not found").build();
     }
}
Summary
This chapter laid a solid foundation on the Jakarta EE 10 Core Profile, emphasizing its crucial role in developing microservices using MicroProfile. The next chapter will delve deeper into REST architectural patterns, design considerations, and best practices.
MicroProfile OpenAPI
Introduction
This chapter explores MicroProfile OpenAPI, demonstrating how to integrate it into your MicroProfile applications and how to annotate your RESTful services to produce rich documentation that adheres to the OpenAPI specification.
Topics to be covered
- Introduction to MicroProfile OpenAPI
- OpenAPI Specification
- Capabilities of MicroProfile OpenAPI
- Generating OpenAPI Documents
- Using Annotations
- Exploring APIs using Swagger UI
OpenAPI Specification
The Open API Specification (OAS), formerly the Swagger specification, defines a standard, language-agnostic interface to RESTful APIs. It enables:
- Clear and comprehensive API contracts
- Standardized description of API structure, requests, responses, and authentication
- Ecosystem of tools for documentation generation, client SDK creation, and API testing
The OpenAPI Initiative maintains the OpenAPI Specification. It is used by Google, Microsoft, Amazon, and many others.
Introduction to MicroProfile OpenAPI
MicroProfile OpenAPI builds upon OAS and leverages annotations from Jakarta RESTful Web Services. It focuses on defining REST APIs that utilize JSON within the context of HTTP, providing a uniform way of describing APIs that is both human-readable and machine-readable.
Capabilities
- API Documentation Generation — Interactive documentation portals emerge directly from the specification.
- Client SDK Creation — Client libraries in various languages can be automatically generated.
- API Testing — Testing frameworks can leverage the specification to design robust tests.
- API Mocking — Simplifies mocking APIs for testing and development purposes.
Adding the Dependency
<dependency>
  <groupId>org.eclipse.microprofile.openapi</groupId>
  <artifactId>microprofile-openapi-api</artifactId>
  <version>3.1.1</version>
</dependency>
Annotating your REST Resources
import org.eclipse.microprofile.openapi.annotations.Operation;
import org.eclipse.microprofile.openapi.annotations.media.Content;
import org.eclipse.microprofile.openapi.annotations.media.Schema;
import org.eclipse.microprofile.openapi.annotations.responses.APIResponse;
import org.eclipse.microprofile.openapi.annotations.responses.APIResponses;

@ApplicationScoped
@Path("/products")
@Tag(name = "Product Resource", description = "CRUD operations for products")
public class ProductResource {

    @GET
    @Produces(MediaType.APPLICATION_JSON)
    @Operation(
        summary = "List all products",
        description = "Retrieves a list of all available products"
    )
    @APIResponses(value = {
        @APIResponse(
            responseCode = "200",
            description = "Successful, list of products found",
            content = @Content(mediaType = "application/json",
                    schema = @Schema(implementation = Product.class))
        ),
        @APIResponse(
            responseCode = "400",
            description = "Unsuccessful, no products found"
        )
    })
    public List<Product> getAllProducts() {
        // Method implementation
    }
}
Enable scanning in microprofile-config.properties:
mp.openapi.scan=true
Viewing the Generated Documentation
The raw OpenAPI spec (YAML format) is available at:
http://localhost:9080/openapi/
The Swagger UI is at:
http://localhost:9080/openapi/ui
Example Generated YAML
openapi: 3.0.3
info:
  title: Generated API
  version: "1.0"
paths:
  /api/products:
    get:
      responses:
        "200":
          description: OK
          content:
            application/json:
              schema:
                type: array
                items:
                  $ref: '#/components/schemas/Product'
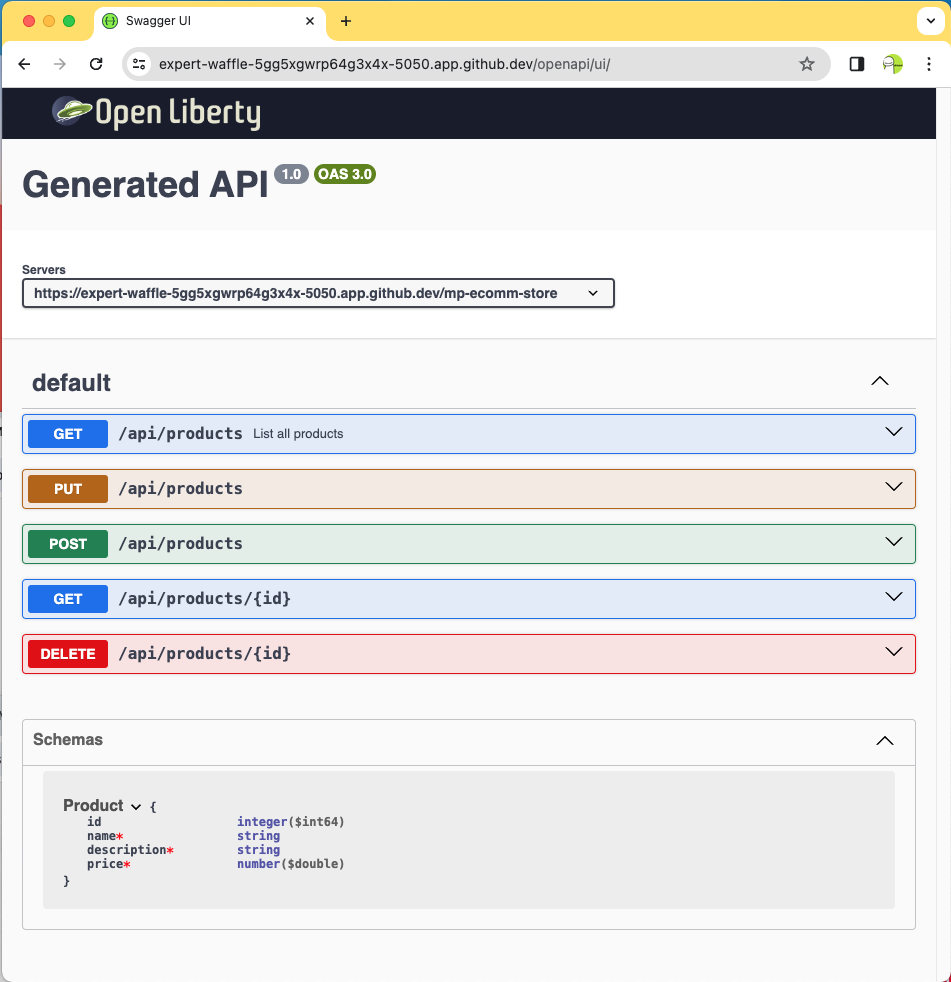
Figure 1. Swagger UI for Product REST Resource
Annotations Reference
| Annotation | Details |
|---|---|
@OpenAPIDefinition |
Provides metadata about the entire API (title, description, version). |
@Info |
Used inside @OpenAPIDefinition for API metadata. |
@Contact |
Specifies contact information for the API. |
@License |
Defines the license information for the API. |
@Operation |
Describes a single API operation on a resource. |
@APIResponse |
Documents a response from an operation. |
@APIResponses |
Container for multiple @APIResponse annotations. |
@RequestBody |
Describes the request body of an HTTP request. |
@Schema |
Provides schema details for a response or request body. |
@Parameter |
Provides information on path, query, or header parameters. |
@Tag |
Adds metadata to categorize operations by resources. |
@Content |
Specifies the media type and schema of the body. |
@SecurityRequirement |
Specifies a security requirement for an operation. |
@Server |
Describes a server that hosts the API. |
Summary
By integrating MicroProfile OpenAPI, developers can generate detailed, OpenAPI-compliant documentation automatically, fostering better understanding and interaction among services. This accelerates development cycles and fosters a more robust and collaborative developer ecosystem.
MicroProfile Configuration
Introduction
This chapter focuses on MicroProfile Configuration, a key feature that allows developers to externalize configuration properties from their code. You can adapt configuration parameters to different environments without altering the core code.
Topics to be covered
- Understanding MicroProfile Configuration
- Different Environments for Microservices Development
- Working with Various Configuration Sources
- Key Capabilities of MicroProfile Configuration
- Implementing Configuration Properties
- Creating a Custom ConfigSource
- Managing Configuration for Different Environments
- Best Practices and Security
Understanding MicroProfile Configuration
MicroProfile Configuration allows developers to inject configuration values into applications. By separating configuration data (database URLs, API credentials, feature flags) from the codebase, you make it easier to modify settings without recompiling and redeploying.
Different Environments
Microservices development typically uses:
- Development Environment — Local or development databases with dummy data; verbose logging.
- Testing/QA Environment — Mirrors production settings; connects to a testing database.
- Staging Environment — Production-like environment for final testing.
- Production Environment — Live environment with actual user data; all security features enabled.
Built-in Configuration Sources
MicroProfile Config includes three default configuration sources, in order of precedence:
- System Properties (
400) — Set using-Dflag when starting the JVM. - Environment Variables (
300) — Available in the system, useful in containerized environments. - microprofile-config.properties (
100) — Placed in theMETA-INFdirectory.
Adding the Dependency
<dependency>
  <groupId>org.eclipse.microprofile.config</groupId>
  <artifactId>microprofile-config-api</artifactId>
  <version>3.1</version>
</dependency>
Implementing Configuration Properties
Create src/main/resources/META-INF/microprofile-config.properties:
product.maintenanceMode=false
Reading Configuration Properties
@Path("/products")
@ApplicationScoped
public class ProductResource {

   @Inject
   @ConfigProperty(name="product.maintenanceMode", defaultValue="false")
   private boolean maintenanceMode;

   @Inject
   private ProductRepository productRepository;

   @GET
   @Produces(MediaType.APPLICATION_JSON)
   public Response getProducts() {
       List<Product> products = productRepository.findAllProducts();

       if (maintenanceMode) {
          return Response
                  .status(Response.Status.SERVICE_UNAVAILABLE)
                  .entity("The product catalog service is currently in maintenance mode.")
                  .build();
       } else if (products != null && !products.isEmpty()) {
           return Response.status(Response.Status.OK).entity(products).build();
       } else {
          return Response.status(Response.Status.NOT_FOUND)
                  .entity("No products found").build();
       }
   }
}
Key annotations:
- @ConfigProperty(name="product.maintenanceMode", defaultValue="false") — Injects a configuration property with a default fallback value.
Creating a Custom ConfigSource
package io.microprofile.tutorial.store.payment.config;

import org.eclipse.microprofile.config.spi.ConfigSource;
import java.util.HashMap;
import java.util.Map;
import java.util.Set;

public class PaymentServiceConfigSource implements ConfigSource {

   private Map<String, String> properties = new HashMap<>();

   public PaymentServiceConfigSource() {
       // Load payment service configurations dynamically
       properties.put("payment.gateway.apiKey", "secret_api_key");
       properties.put("payment.gateway.endpoint", "https://api.paymentgateway.com");
   }

   @Override
   public Map<String, String> getProperties() { return properties; }

   @Override
   public String getValue(String propertyName) { return properties.get(propertyName); }

   @Override
   public String getName() { return "PaymentServiceConfigSource"; }

   @Override
   public int getOrdinal() { return 600; } // High priority

   @Override
   public Set<String> getPropertyNames() { return properties.keySet(); }
}
Register in /META-INF/services/org.eclipse.microprofile.config.spi.ConfigSource.
Using the Custom Config Source
@Path("/authorize")
@RequestScoped
public class PaymentService {

    @Inject
    @ConfigProperty(name = "payment.gateway.apiKey")
    private String apiKey;

    @Inject
    @ConfigProperty(name = "payment.gateway.endpoint")
    private String endpoint;

    @POST
    @Consumes(MediaType.APPLICATION_JSON)
    @Produces(MediaType.APPLICATION_JSON)
    public Response processPayment(PaymentDetails paymentDetails) {
        System.out.println("Calling payment gateway API at: " + endpoint);
        String result = "{\"status\":\"success\", \"message\":\"Payment processed successfully.\"}";
        return Response.ok(result, MediaType.APPLICATION_JSON).build();
    }
}
Managing Configuration for Different Environments
Option 1: Prefix configurations by environment:
dev.database.url=jdbc:h2:mem:testdb
test.database.url=jdbc:postgresql://test-server/db
prod.database.url=jdbc:postgresql://prod-server/db
Option 2: Use environment variables (override at runtime):
export DATABASE_URL=jdbc:postgresql://prod-server/db
Option 3: Custom ConfigSources that connect to external services (Consul, AWS Parameter Store, etc.)
Enabling MicroProfile Config in Open Liberty
<server description="MicroProfile Tutorial Server">
  <featureManager>
    <feature>mpConfig-3.1</feature>
  </featureManager>
</server>
Best Practices
- Encrypt Sensitive Configuration Values — Use secure communication channels and encrypt sensitive data.
- Use Environment Variables for Sensitive Values — Leverage the platform's security model.
- Implement Access Control — Ensure only authorized personnel have access to configuration files.
- Audit and Monitor Configuration Access — Regularly audit access to configuration files.
- Configuration Validation — Validate configuration data at startup.
- Keep Configuration Data Updated — Regularly review and update configuration data.
Summary
The MicroProfile Config specification offers a robust and adaptable framework for managing application configurations. By implementing MicroProfile Config, developers can effectively manage configuration changes, ensuring their microservices remain responsive and resilient in dynamic environments.
MicroProfile Health
Introduction
This chapter provides an in-depth exploration of MicroProfile Health, a critical component for ensuring the reliability and availability of microservices in a cloud environment where automatic scaling, failover, and recovery are essential.
Topics to be covered
- Overview of MicroProfile Health
- Key Concepts
- Types of Health Checks
- Exposing Health Checks
- Steps for Implementing Health Checks
- Integration with CDI
- Kubernetes Probe Configuration
- Best Practices
Overview of MicroProfile Health
The MicroProfile Health specification offers a standardized mechanism for microservices to report their health status via HTTP. These health checks can be used by external systems to verify the operational status of services — crucial in modern cloud environments where automated processes continuously monitor service health.
Types of Health Checks
Liveness Checks (@Liveness)
Determine if a microservice is in a state where it can perform its functions correctly. A failing liveness check suggests the microservice is in a broken state and may need to be restarted (e.g., deadlocks, infinite loops).
Readiness Checks (@Readiness)
Determine if a microservice is ready to process requests. If a readiness check fails, the microservice should not receive inbound requests (e.g., still initializing, waiting for dependencies).
Startup Checks (@Startup)
Verify the microservice's health immediately after it has started. Provides a mechanism to postpone other health checks until certain startup conditions are fulfilled (e.g., loading configurations, establishing database connections).
Exposing Health Checks
Health checks are exposed via HTTP endpoints automatically:
| Endpoint | Description |
|---|---|
/health |
Aggregates all health check responses |
/health/live |
Returns responses from liveness checks |
/health/ready |
Returns responses from readiness checks |
/health/started |
Returns responses from startup checks |
Example JSON Response
{
  "status": "UP",
  "checks": [
    {
      "name": "LivenessCheck",
      "status": "UP"
    }
  ]
}
Adding the Dependency
<dependency>
  <groupId>org.eclipse.microprofile.health</groupId>
  <artifactId>microprofile-health-api</artifactId>
  <version>4.0.1</version>
</dependency>
Implementing Health Checks
Readiness Check
package io.microprofile.tutorial.store.product.health;

import org.eclipse.microprofile.health.HealthCheck;
import org.eclipse.microprofile.health.HealthCheckResponse;
import org.eclipse.microprofile.health.Readiness;

@Readiness
@ApplicationScoped
public class ProductServiceHealthCheck implements HealthCheck {

    @PersistenceContext
    EntityManager entityManager;

    @Override
    public HealthCheckResponse call() {
        if (isDatabaseConnectionHealthy()) {
            return HealthCheckResponse.named("ProductServiceReadinessCheck").up().build();
        } else {
            return HealthCheckResponse.named("ProductServiceReadinessCheck").down().build();
        }
    }

    private boolean isDatabaseConnectionHealthy() {
        try {
            entityManager.find(Product.class, 1L);
            return true;
        } catch (Exception e) {
            return false;
        }
    }
}
Liveness Check
@Liveness
@ApplicationScoped
public class ProductServiceLivenessCheck implements HealthCheck {

   @Override
   public HealthCheckResponse call() {
       Runtime runtime = Runtime.getRuntime();
       long maxMemory = runtime.maxMemory();
       long usedMemory = runtime.totalMemory() - runtime.freeMemory();
       long availableMemory = maxMemory - usedMemory;
       long threshold = 100 * 1024 * 1024; // 100MB

       HealthCheckResponseBuilder builder = HealthCheckResponse
            .named("systemResourcesLiveness")
            .withData("AvailableMemory", availableMemory)
            .withData("MaxMemory", maxMemory);

       if (availableMemory > threshold) {
           return builder.up().build();
       } else {
           return builder.down().build();
       }
    }
}
Startup Check
@Startup
@ApplicationScoped
public class ProductServiceStartupCheck implements HealthCheck {

    @PersistenceUnit
    private EntityManagerFactory emf;

    @Override
    public HealthCheckResponse call() {
        if (emf != null && emf.isOpen()) {
            return HealthCheckResponse.up("ProductServiceStartupCheck");
        } else {
            return HealthCheckResponse.down("ProductServiceStartupCheck");
        }
    }
}
Kubernetes Probe Configuration
apiVersion: v1
kind: Pod
metadata:
  name: mp-pod
spec:
  containers:
  - name: my-mp-app
    image: myimage:v1
    readinessProbe:
      httpGet:
        path: /health/ready
        port: 8080
      initialDelaySeconds: 15
      timeoutSeconds: 2
      periodSeconds: 5
      failureThreshold: 3
    livenessProbe:
      httpGet:
        path: /health/live
        port: 8080
      initialDelaySeconds: 30
      periodSeconds: 10
Best Practices
- Clearly Define Health Check Types — Use readiness, liveness, and startup checks appropriately.
- Implement Meaningful Health Checks — Ensure checks accurately reflect the operational state.
- Utilize Health Check Responses — Include UP/DOWN status and additional metadata.
- Secure Health Check Endpoints — Consider the security of health check endpoints.
- Monitor Health Check Performance — Checks should be lightweight and not introduce overhead.
Summary
MicroProfile Health offers a robust framework for monitoring and managing the health of microservices. By following the guidelines and best practices outlined in this chapter, developers can effectively implement and leverage health checks to maintain the overall health of their applications.
MicroProfile Metrics
Introduction
This chapter provides a comprehensive overview of MicroProfile Metrics, a widely used specification for monitoring microservices. You will gain an understanding of the various types of metrics and how to use them to monitor microservices effectively.
Topics to be covered
- Introduction to MicroProfile Metrics
- Need for Metrics in Microservices
- Types of Metrics
- MicroProfile Metrics Dependency
- Metrics Annotations
- Categories of Metrics
- Metric Registry
- Instrumenting Microservices with Metrics
- Creating Custom Metrics
Introduction to MicroProfile Metrics
MicroProfile Metrics provides a set of annotations and APIs to track various metrics related to the application's health and performance. It defines a standardized format for exposing metrics that tools like Prometheus can collect and track.
Prometheus is a powerful tool for monitoring and collecting metrics from your services, providing a highly efficient time-series database system.
Need for Metrics in Microservices
- Performance Tuning — Identify bottlenecks and optimize resource utilization.
- Scalability — Make informed decisions on when to scale services up or down.
- Troubleshooting — Quickly pinpoint issues by analyzing trends in performance metrics.
- Service Health Monitoring — Complement health checks with deeper insights into internal state.
Types of Metrics
| Type | Description |
|---|---|
| Counter | A numerical value that can only increase over time. Used to count occurrences (e.g., number of requests). |
| Gauge | Measures an instantaneous value that can go up or down (e.g., queue size, memory usage). |
| Histogram | Provides a distribution of values across ranges (e.g., response time buckets). |
| Timer | Aggregates timing durations: count, total time, mean, and maximum duration. |
Adding the Dependency
<dependency>
  <groupId>org.eclipse.microprofile.metrics</groupId>
  <artifactId>microprofile-metrics-api</artifactId>
  <version>5.1.1</version>
</dependency>
For Gradle:
dependencies {
    providedCompile 'org.eclipse.microprofile.metrics:microprofile-metrics-api:5.1.1'
}
Metrics Annotations
| Annotation | Description |
|---|---|
@Timed |
Times how long a method takes to execute. |
@Counted |
Tracks how many times a method is invoked. |
@Gauge |
Exposes a custom metric that can be any value. |
Categories of Metrics
- Base Metrics — JVM metrics (memory, CPU, threads, garbage collection). Available at
/metrics?scope=base. - Application Metrics — Custom metrics defined by developers. Available at
/metrics?scope=application. - Vendor Metrics — Runtime-specific metrics. Available at
/metrics?scope=vendor.
Metric Registry
The MetricRegistry acts as a container for storing and managing metrics. Types:
MetricRegistry.Type.APPLICATION— Custom application metrics.MetricRegistry.Type.BASE— Common JVM metrics.MetricRegistry.Type.VENDOR— Implementation-specific metrics.
Instrumenting Microservices
Tracking response time with @Timed
@Timed(
    name = "productLookupTime",
    tags = {"method=getProduct"},
    absolute = true,
    description = "Time spent looking up products"
)
public Response getProductById(@PathParam("id") Long id) {
    return productService.getProduct(id);
}
Output at /metrics?scope=application:
# HELP productLookupTime_seconds_max Time spent looking up products
# TYPE productLookupTime_seconds_max gauge
productLookupTime_seconds_max{method="getProduct",mp_scope="application",} 0.002270643
Tracking invocations with @Counted
@Counted(
    name = "productAccessCount",
    absolute = true,
    description = "Number of times the list of products is requested"
)
public Response getAllProducts() {
   // Method implementation
}
Output:
# HELP productAccessCount_total Number of times the list of products is requested
# TYPE productAccessCount_total counter
productAccessCount_total{mp_scope="application",} 3.0
Creating a Custom Metric
@GET
@Path("/count")
@Produces(MediaType.APPLICATION_JSON)
@Gauge(
    name = "productCatalogSize",
    unit = "none",
    description = "Current number of products in the catalog"
)
public long getProductCount() {
   return productCatalogSize;
}
Access at:
/metrics?name=io_microprofile_tutorial_store_product_resource_ProductResource_productCatalogSize
Output:
# HELP ...productCatalogSize Current number of products in the catalog
# TYPE ...productCatalogSize gauge
...productCatalogSize{mp_scope="application",} 8.0
Summary
This chapter delved into MicroProfile Metrics, illuminating its role as a pivotal specification for efficiently monitoring microservices. Through practical examples, we showcased how to instrument microservices with MicroProfile Metrics and create custom metrics for comprehensive monitoring.
MicroProfile Fault Tolerance
Introduction
In a Microservices architecture, a single failure can propagate across the entire application, potentially causing widespread outages. MicroProfile Fault Tolerance offers strategies for building resilient and reliable microservices, ensuring service continuity and stability even during unexpected failures.
Topics to be Covered
- What is Fault Tolerance?
- Key Strategies for Enhancing Fault Tolerance
- Implementing Retry Policies and Configuration
- Avoiding and Managing Cascading Failures
- Configuring Circuit Breaker
- Using
@AsynchronousAnnotation - Setting Timeouts
- Implementing Fallback Logic
- Isolating Resources with Bulkheads
What is Fault Tolerance?
Fault tolerance is a system's ability to continue working correctly even in case of unexpected failures. A fault-tolerant system should be able to detect, isolate, and recover from errors without human intervention.
Key Strategies
- Retry — Automatically retry failed operations, useful for transient errors like network glitches.
- Timeout — Set a time limit for operations, preventing indefinite waits.
- Circuit Breaker — Stop repeated calls to failing services, allowing them to recover.
- Bulkhead — Isolate failures by segregating resources (thread pools, connection pools).
- Fallback — Provide a default response when an operation fails.
Adding the Dependency
<dependency>
  <groupId>org.eclipse.microprofile.fault-tolerance</groupId>
  <artifactId>microprofile-fault-tolerance-api</artifactId>
  <version>4.1.1</version>
</dependency>
Fault Tolerance Annotations
| Annotation | Description |
|---|---|
@Asynchronous |
Ensures the method executes in a separate thread for non-blocking execution. |
@Retry |
Automatically retries on failure with configurable delay, jitter, and max retries. |
@Timeout |
Specifies maximum duration before method is aborted with TimeoutException. |
@CircuitBreaker |
Prevents repeated calls to failing services with configurable failure ratio and delay. |
@Fallback |
Specifies alternative logic when the primary method fails. |
@Bulkhead |
Limits the number of concurrent method executions for resource isolation. |
Implementing Retry Policies
@Retry(
    maxRetries = 3,
    delay = 2000,
    jitter = 500,
    retryOn = PaymentProcessingException.class,
    abortOn = CriticalPaymentException.class
)
public Response processPayment(PaymentDetails paymentDetails)
        throws PaymentProcessingException {

    System.out.println("Processing payment for amount: " + paymentDetails.getAmount());

    // Simulating a transient failure
    if (Math.random() > 0.7) {
        throw new PaymentProcessingException("Temporary payment processing failure");
    }

    return Response.ok("{\"status\":\"success\"}", MediaType.APPLICATION_JSON).build();
}
@Retry Parameters
| Parameter | Description |
|---|---|
maxRetries |
Maximum number of retries. |
delay |
Time (ms) to wait between retry attempts. |
jitter |
Random variation (ms) to avoid synchronized retries (thundering herd). |
retryOn |
Exception(s) that should trigger a retry. |
abortOn |
Exception(s) that should NOT trigger a retry. |
maxDuration |
Total time limit for all retries. |
Externalizing Retry Configuration
io.microprofile.tutorial.store.payment.service.PaymentService/processPayment/Retry/maxRetries=3
io.microprofile.tutorial.store.payment.service.PaymentService/processPayment/Retry/delay=2000
io.microprofile.tutorial.store.payment.service.PaymentService/processPayment/Retry/jitter=500
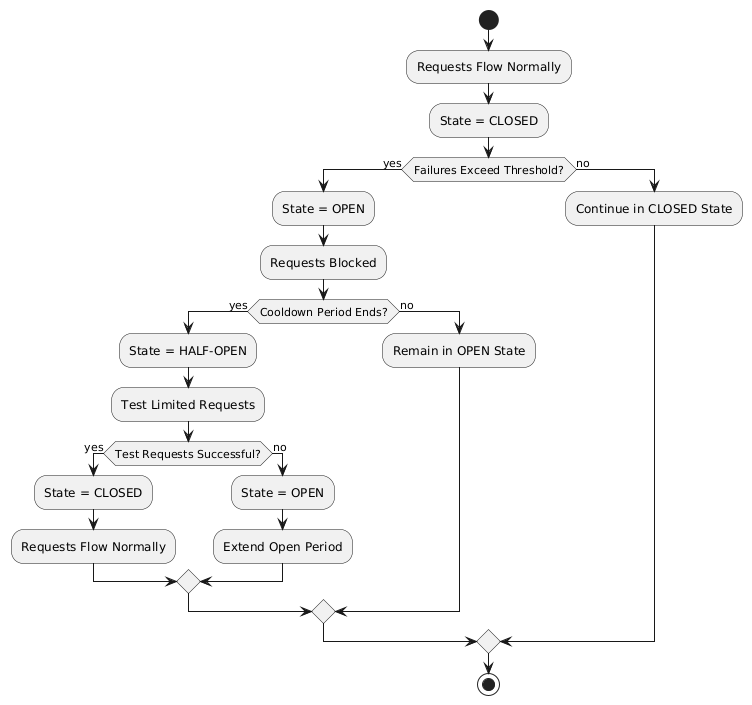
Configuring Circuit Breaker
@CircuitBreaker(
    requestVolumeThreshold = 10,
    failureRatio = 0.5,
    delay = 5000,
    successThreshold = 2,
    failOn = RuntimeException.class
)
public String getProduct(Long id) {
    if (Math.random() > 0.7) {
        throw new RuntimeException("Simulated service failure");
    }
    return repository.findProductById(id);
}
Behavior: The circuit breaker opens if 50% of requests fail (failureRatio = 0.5) after at least 10 requests (requestVolumeThreshold = 10). It remains open for 5 seconds (delay = 5000), then transitions to "half-open". Two consecutive successes (successThreshold = 2) close the circuit breaker.
Circuit Breaker Parameters
| Parameter | Description |
|---|---|
failureRatio |
Proportion of failed requests required to open the circuit. |
requestVolumeThreshold |
Minimum requests before failure ratio is evaluated. |
delay |
Time (ms) the circuit stays open before going "half-open". |
successThreshold |
Consecutive successes needed in "half-open" to close circuit. |
failOn |
Exception(s) counted as failures. |
Using @Asynchronous
@ApplicationScoped
public class PaymentService {

    @Asynchronous
    public CompletionStage<String> processPayment() {
        simulateDelay();
        return CompletableFuture.completedFuture("Payment processed asynchronously.");
    }

    private void simulateDelay() {
        try {
            Thread.sleep(2000); // Simulating delay
        } catch (InterruptedException e) {
            Thread.currentThread().interrupt();
        }
    }
}
Setting Timeouts
@Asynchronous
@Timeout(1000) // 1 second timeout
public CompletionStage<String> processPayment(PaymentDetails paymentDetails) {
    return CompletableFuture.supplyAsync(() -> {
        simulateDelay(); // Will exceed 1000ms, triggering TimeoutException
        return "{\"status\":\"success\"}";
    }).exceptionally(ex -> "{\"status\":\"timeout\"}");
}
Implementing Fallbacks
@Fallback(fallbackMethod = "fallbackProcessPayment")
public Response processPayment(PaymentDetails paymentDetails) {
    throw new RuntimeException("Service Unavailable");
}

public Response fallbackProcessPayment(PaymentDetails paymentDetails) {
    return Response.ok(
        "{\"status\":\"failed\", \"message\":\"Service temporarily unavailable.\"}"
    ).build();
}
Combining Timeout with Fallback
@Timeout(2000)
@Fallback(fallbackMethod = "getProductsFromCache")
public List<Product> getProducts() {
    return productRepository.findAllProducts();
}

public List<Product> getProductsFromCache() {
    System.out.println("Fetching products from cache...");
    return productCache.getAll();
}
Bulkhead — Resource Isolation
Semaphore-Style Bulkhead
@Asynchronous
@Bulkhead(value = 5)
public CompletionStage<String> processPayment() {
    simulateDelay();
    return CompletableFuture.completedFuture("Payment processed.");
}
Allows up to 5 concurrent invocations. Additional requests are immediately rejected.
Thread Pool-Style Bulkhead
@Bulkhead(value = 5, waitingTaskQueue = 10)
@Asynchronous
public CompletionStage<Void> processPayment() {
    return CompletableFuture.runAsync(() -> {
        simulateDelay();
        System.out.println("Payment processed with limited concurrency.");
    });
}
Uses a thread pool of 5 with a queue of 10 tasks, preventing cascading failures.
Best Practices
- Limit Retries — Avoid setting
maxRetriestoo high; excessive retries can overwhelm the system. - Use Jitter — Always configure jitter to reduce synchronized retry attempts.
- Abort Non-Recoverable Errors — Use
abortOnto exclude critical exceptions. - Combine Strategies — Use retries alongside timeouts and circuit breakers for robust error handling.
- Externalize Configuration — Use MicroProfile Config to adjust fault tolerance behavior per environment.
Summary
This chapter explored the MicroProfile Fault Tolerance API and essential fault tolerance strategies: Retries, Timeouts, Circuit Breakers, Bulkheads, and Fallbacks. By leveraging these strategies and combining them effectively, you can design resilient microservices that gracefully handle failures and ensure a seamless user experience.
MicroProfile Telemetry
Introduction
Microservices-based applications benefit from scalability and flexibility but face challenges in availability and performance monitoring. MicroProfile Telemetry provides a set of vendor-neutral APIs for instrumenting, collecting, and exporting telemetry data (traces, metrics, logs), built on OpenTelemetry.
Topics to be covered
- Introduction to MicroProfile Telemetry
- Tracing Concepts: Spans, Traces, Context Propagation, Correlation
- Instrumenting Telemetry
- Tools for Trace Analysis
- Exporting Traces
- Types of Telemetry: Automatic, Manual, Agent
- Analyzing Traces
- Security Considerations for Tracing
Key Challenges in Microservices Observability
- Distributed Architecture Complexity — Tracking requests across multiple nodes and containers.
- Polyglot Architecture — Multiple languages causing inconsistent telemetry data.
- Latency — Communication between microservices adds latency that accumulates.
- Ensuring High Availability — Failures in one microservice can affect dependent services.
Tracing Concepts
Spans
A span is the basic unit of work in tracing — a single operation like an HTTP request, database query, or computation. Each span contains:
- Operation Name — Describes the activity (e.g.,
HTTP GET /products). - Start Time and Duration — When the operation started and how long it took.
- Attributes — Key-value pairs providing context (user IDs, HTTP status codes).
- Parent Span ID — Indicates the parent span, forming a hierarchy.
Traces
A trace is a collection of related spans representing the end-to-end execution of a request:
API Gateway (Root Span)
│
├── Order Service (Child Span)
│   ├── Database Query
│   └── Return Response
│
└── Final Response to User
Context Propagation
Context propagation carries trace-related metadata (trace IDs, span IDs) across service and thread boundaries, ensuring all spans can be linked to form a complete trace.
Correlation
Correlation associates related spans across multiple services and threads. When viewing logs, the traceId and spanId link specific log entries to corresponding spans.
Instrumenting Telemetry
Step 1: Add the MicroProfile Telemetry Dependency
<dependency>
   <groupId>org.eclipse.microprofile.telemetry</groupId>
   <artifactId>microprofile-telemetry-api</artifactId>
   <version>1.1</version>
   <scope>provided</scope>
</dependency>
Step 2: Create a Tracer and Span
import io.opentelemetry.api.trace.Tracer;
import io.opentelemetry.api.trace.Span;

@ApplicationScoped
public class PaymentService {

    @Inject
    Tracer tracer;

    public void processPayment(String orderId, double amount) {
        Span span = tracer.spanBuilder("payment.process").startSpan();

        try {
            span.setAttribute("order.id", orderId);
            span.setAttribute("payment.amount", amount);
            span.setAttribute("payment.status", "IN_PROGRESS");

            executePayment(orderId, amount);

            span.setAttribute("payment.status", "SUCCESS");
        } catch (Exception e) {
            span.setAttribute("payment.status", "FAILED");
            span.recordException(e);
        } finally {
            span.end();
        }
    }
}
Step 3: Using the @WithSpan Annotation (Simpler Approach)
import io.opentelemetry.instrumentation.annotations.WithSpan;

@ApplicationScoped
public class PaymentService {

    @WithSpan
    public void processPayment(String orderId) {
        // A new span is automatically created whenever this method is called
        // Business logic here
    }
}
Step 4: Add Attributes to Spans
span.setAttribute("http.method", "GET");
span.setAttribute("http.url", "/products/12345");
span.setAttribute("user.id", "98765");
Exporting the Traces
Configure in src/main/resources/META-INF/microprofile-config.properties:
# Enable OpenTelemetry (disabled by default)
otel.sdk.disabled=false

# Exporter type
otel.traces.exporter=otlp

# OTLP endpoint
otel.exporter.otlp.endpoint=http://localhost:4317

# Service name
otel.service.name=payment-service

# Sampling rate (1.0 = always trace)
otel.traces.sampler=parentbased_always_on
Tools for Trace Analysis
Jaeger
Jaeger is an open-source distributed tracing system. Run with Docker:
docker run -d --name jaeger \
  -p 16686:16686 \
  -p 14250:14250 \
  jaegertracing/all-in-one:latest
Access Jaeger UI at http://localhost:16686.
Zipkin
Zipkin is a lightweight distributed tracing system ideal for quick deployment with minimal resource usage.
Grafana Tempo
Grafana Tempo is a cost-efficient distributed tracing backend that requires only object storage. Provides tight integration with Grafana dashboards for correlating logs, metrics, and traces.
Automatic vs Manual Instrumentation
| Type | Description |
|---|---|
| Automatic | No code changes needed. Set otel.sdk.disabled=false. Instruments Jakarta REST and MicroProfile REST clients automatically. |
| Manual | Fine-grained control using @WithSpan annotation or SpanBuilder API. |
| Agent | Attach a Java agent at startup. No code changes required. Uses OpenTelemetry Java Agent. |
Security Considerations for Tracing
- Data Sensitivity — Avoid logging PII, passwords, API keys, or payment information in spans.
- Access Control — Implement strict RBAC to limit who can view trace data.
- Encryption — Use HTTPS/TLS for exporting trace data.
- Sampling Strategies — Use sampling to reduce trace volume and minimize data exposure.
- Compliance — Ensure tracing practices comply with GDPR, CCPA, or HIPAA.
// Good: Anonymize sensitive data
span.setAttribute("user.id", "anonymized-user-id");
span.setAttribute("credit.card.last4", "****1234");
Conclusion
MicroProfile Telemetry provides a robust foundation for observability in Java-based microservices. By leveraging distributed tracing, you can gain deep insights into request flows, identify bottlenecks, and enhance the reliability of your applications while adhering to security best practices.
JWT Authentication
Introduction
In modern microservices architectures, securing communications between clients and services is critical. JSON Web Token (JWT) provides a lightweight, self-contained, and efficient mechanism for authentication and authorization.
MicroProfile JWT standardizes JWT-based authentication for Java microservices. It supports Role-Based Access Control (RBAC), simplifies identity management in stateless services, and avoids vendor lock-in by adhering to open standards (RFC 7519).
Topics to be covered
- Introduction to JWT Authentication
- Structure of JWT
- Types of Claims
- Use Cases for JWTs
- Benefits of JWT in Microservices
- Setting up MicroProfile JWT
- Configuring JWT Validation
- Request Flow in MicroProfile JWT
- Role-Based Access Control (RBAC)
- Setting Token Expiry Times
- Error Handling
- Best Practices
Structure of a JWT
A JWT consists of three Base64 encoded parts, separated by dots (.):
<Header>.<Payload>.<Signature>
Header:
{
  "alg": "RS256",
  "typ": "JWT"
}
Payload:
{
  "iss": "https://io.microprofile.com/issuer",
  "sub": "user1",
  "exp": 1735689600,
  "iat": 1735686000,
  "aud": "my-audience",
  "groups": ["user", "admin"]
}
Signature — A digital signature created from the encoded header, payload, and a private key.
Types of Claims
Standard Claims
| Claim | Description | Example |
|---|---|---|
iss |
Issuer — who issued the JWT | "https://io.microprofile.com/issuer" |
sub |
Subject — the principal the JWT is about | "user1" |
aud |
Audience — intended recipients | "order-service" |
exp |
Expiration time | 1735689600 |
iat |
Issued at | 1735686000 |
jti |
Unique JWT token identifier | "a1b2c3d4" |
groups |
Roles or groups assigned to user | ["user", "admin"] |
Custom Claims
Application-specific claims that extend authorization logic (e.g., department, region, tenant_id). MicroProfile JWT allows accessing these programmatically.
Adding the Dependency
<dependency>
    <groupId>org.eclipse.microprofile.jwt</groupId>
    <artifactId>microprofile-jwt-auth-api</artifactId>
    <version>2.1</version>
    <scope>provided</scope>
</dependency>
Configuring JWT Validation
In src/main/resources/microprofile-config.properties:
# Public key (PEM format) to verify JWT signatures
mp.jwt.verify.publickey.location=META-INF/publicKey.pem

# Expected issuer
mp.jwt.verify.issuer=https://auth.example.com

# Optional: Validate token audience
mp.jwt.verify.audiences=order-service,payment-service
Place the PEM-encoded public key in src/main/resources/META-INF/publicKey.pem.
Request Flow in MicroProfile JWT
Clients include the JWT in the Authorization: Bearer header:
GET /api/orders HTTP/1.1
Authorization: Bearer eyJhbGciOiJSUzI1NiIs...
MicroProfile JWT runtime automatically:
1. Extracts the token from the Bearer schema.
2. Decodes the JWT (header, payload, signature).
3. Verifies the signature using the public key.
4. Validates standard claims (iss, exp, aud).
5. Populates the SecurityContext with the JWT claims.
Role-Based Access Control (RBAC)
@Path("/orders")
public class OrderResource {

  @GET
  @Path("/{id}")
  @RolesAllowed("user")  // Only users with "user" role can access
  public Response getOrder(@PathParam("id") String id, @Context SecurityContext ctx) {
    String user = ctx.getUserPrincipal().getName();
    return Response.ok("Order for user: " + user + ", ID: " + id).build();
  }

  @DELETE
  @Path("/{id}")
  @RolesAllowed("admin")  // Only admins can delete
  public Response deleteOrder(@PathParam("id") String id, @Context SecurityContext ctx) {
    String admin = ctx.getUserPrincipal().getName();
    return Response.ok("Order deleted by admin: " + admin + ", ID: " + id).build();
  }
}
Accessing JWT Claims
@GET
@Path("/user-profile")
public String getUserProfile(@Context SecurityContext ctx) {
    JsonWebToken jwt = (JsonWebToken) ctx.getUserPrincipal();
    String userId = jwt.getName();              // "sub" claim
    Set<String> roles = jwt.getGroups();        // "groups" claim
    String tenant = jwt.getClaim("tenant_id");  // Custom claim

    return "User: " + userId + ", Roles: " + roles + ", Tenant: " + tenant;
}
Error Handling
| Scenario | Response |
|---|---|
| Invalid/malformed JWT | 401 Unauthorized — error="invalid_token" |
| Expired token | 401 Unauthorized — error_description="Token expired" |
| Missing token | 401 Unauthorized — error="missing_token" |
| Insufficient permissions | 403 Forbidden |
Best Practices
- Use Standard Claims — Prefer the
groupsclaim for roles. - Consistent Role Names — Ensure role names are consistent across JWTs and
@RolesAllowed. - Least Privilege — Assign minimal required roles to endpoints.
- Use Short-Lived Tokens — Set short expiration times (15–30 minutes).
- Secure Token Transmission — Use HTTPS; store tokens in
Authorization: Bearerheaders (never in URLs). - Manage Cryptographic Keys Securely — Store public keys securely; rotate periodically.
- Validate All Claims — Validate
iss,aud, and sanitize custom claims to prevent injection attacks.
Conclusion
MicroProfile JWT offers a standards-based, interoperable approach for securing microservices. It simplifies identity propagation, access control, and stateless security across distributed services.
Further Reading: - RFC 7519 - MicroProfile JWT 2.1 Spec - Jakarta Security 3.0
MicroProfile Rest Client
Introduction
The MicroProfile Rest Client specification simplifies RESTful service consumption in Java microservices by replacing manual HTTP handling with a type-safe, annotation-driven approach. Developers define Java interfaces that mirror the target service's API, and the framework generates an implementation at runtime.
Topics to be covered
- Introduction to MicroProfile Rest Client
- Setting up Dependencies
- Defining a Rest Client Interface
- Parameter Configuration
- Requests and Response Handling
- Handling JSON Data formats
- Error Handling Strategies
Key Features
- Type-Safe and Declarative APIs — Define REST clients as Java interfaces using Jakarta RESTful Web Services annotations.
- Integration with CDI — Inject interfaces using
@Injectand@RestClient. - Runtime Configurable — Configure client behavior via MicroProfile Config without recompilation.
- Asynchronous Execution — Return
CompletionStage<T>for non-blocking requests. - Exception Handling — Custom exception mapping with
ResponseExceptionMapper. - Fault Tolerance Integration — Supports
@Retry,@CircuitBreaker, and@Bulkhead.
Setting up Dependencies
Maven:
<dependency>
    <groupId>org.eclipse.microprofile.rest.client</groupId>
    <artifactId>microprofile-rest-client-api</artifactId>
    <version>3.1</version>
</dependency>
Creating a Rest Client Interface
package io.microprofile.tutorial.inventory.client;

import jakarta.ws.rs.GET;
import jakarta.ws.rs.Path;
import jakarta.ws.rs.PathParam;
import org.eclipse.microprofile.rest.client.inject.RegisterRestClient;

@RegisterRestClient(configKey = "product-service")
@Path("/products")
public interface ProductServiceClient {

    @GET
    @Path("/{id}")
    Product getProductById(@PathParam("id") Long id);
}
Key annotations:
- @RegisterRestClient — Declares this interface as a MicroProfile Rest Client, enabling CDI injection.
- configKey = "product-service" — Associates the client with a MicroProfile Config key.
Configure in microprofile-config.properties:
product-service/mp-rest/url=http://localhost:8080/api/products
product-service/mp-rest/followRedirects=true
Injecting and Using the Client
@ApplicationScoped
public class InventoryResource {

    @Inject
    @RestClient
    ProductServiceClient productServiceClient;

    public Product getProduct(Long id) {
        return productServiceClient.getProductById(id);
    }
}
Parameter Configurations
Path Parameters (@PathParam)
@GET
@Path("/{id}")
Product getProductById(@PathParam("id") Long id);
// → GET /products/1
Query Parameters (@QueryParam)
@GET
List<Product> getProductsByCategory(@QueryParam("category") String category);
// → GET /products?category=electronics
Header Parameters (@HeaderParam)
@GET
List<Order> getOrders(@HeaderParam("Authorization") String authToken);
// → GET /orders with Authorization: Bearer my-secret-token
Additional Parameter Annotations
| Annotation | Description |
|---|---|
@CookieParam |
Binds a method parameter to an HTTP cookie. |
@FormParam |
Maps a method parameter to a form field. |
@MatrixParam |
Binds to a matrix parameter in the URL path. |
@BeanParam |
Aggregates multiple annotations into a single Java bean. |
Handling JSON Data
By default, MicroProfile Rest Client uses JSON-B for automatic serialization and deserialization:
@RegisterRestClient
@Path("/products")
@Produces("application/json")
@Consumes("application/json")
public interface ProductServiceClient {

    @GET
    @Path("/{id}")
    Product getProductById(@PathParam("id") Long id);
}
Error Handling with ResponseExceptionMapper
public class ProductServiceResponseExceptionMapper
        implements ResponseExceptionMapper<Throwable> {

    @Override
    public Throwable toThrowable(Response response) {
        if (response.getStatus() == 404) {
            return new ProductNotFoundException("Product not found");
        }
        return new Exception("An unexpected error occurred");
    }
}
Register on your client interface:
@RegisterRestClient(configKey = "product-service")
@RegisterProvider(ProductServiceResponseExceptionMapper.class)
@Path("/products")
public interface ProductServiceClient {
    @GET
    @Path("/{id}")
    Response getProductById(@PathParam("id") Long id);
}
Programmatic Client with RestClientBuilder
Useful when CDI is unavailable or when dynamic client instantiation is required:
public class InventoryService {

    public boolean isProductAvailable(Long productId) {
        URI productApiUri = URI.create("http://localhost:8080/api");

        try (ProductServiceClient productClient = RestClientBuilder.newBuilder()
                .baseUri(productApiUri)
                .connectTimeout(3, TimeUnit.SECONDS)
                .readTimeout(5, TimeUnit.SECONDS)
                .build(ProductServiceClient.class)) {

            Product product = productClient.getProductById(productId);
            return product != null;

        } catch (Exception e) {
            return false;
        }
    }
}
Tip: When using
RestClientBuilder, ensure your client interface extendsAutoCloseableand use try-with-resources for automatic resource cleanup.
Conclusion
The MicroProfile Rest Client provides a declarative, type-safe, and efficient mechanism for interacting with RESTful services in Java microservices. It removes boilerplate HTTP code, automatically handles JSON serialization, and integrates seamlessly with Fault Tolerance, Config, and JWT Authentication.
This concludes the MicroProfile Tutorial. You are now equipped with the foundational knowledge to build robust, cloud-native microservices using the MicroProfile specification. Happy coding!