Do you really need a sledgehammer to crack a nut?

Seeing the number of aspects that need to be covered to achieve the end goal, this blog post is divided into 2 parts. This first part explains the need, possible solution, introduction to MicroProfile, project set-up and implementation of cross-cutting security concerns using MP JWT specification. In the second part we will go through other remaining MicroProfile specifications
Requirement: A reusable component required to record and retrieve consents for minors
In a nutshell, we required an independently deployable service to record and query consent for a minor to or from a DB, which would later be consumed in registration and other application access requests. The service was also required to implement authentication and RBAC security (as per configured scope) with JWT authentication as all other integrations are secured using OpenID connect protocol.
We received this requirement in December 2020 and fortunately, we had the option to choose from available frameworks. The following parameters were set to pick the most suited one:
- The size and scope of the application
- The nature of complexity in the application
- Objective achievement with shippable dependencies versus provided by the runtime
- Testability
- Development efforts
The requirement at hand was then evaluated based on the above parameters and we came up with the below:
- The scope was limited to just one concern and that was recording and retrieving the consent for a minor within a secured context.
- It would be a very simple application with no complex business rules around it like a normal CRUD application.
- We wanted to fully utilize what we could get from the underlying runtime instead of making our artifact look like a shopping trolley full of different things.
- The last two points were also important as an eligible candidate for a chosen framework. They should make the application easily testable and developer-friendly without fuss to keep the code clean and shift responsibility to runtime, wherever possible, to achieve the imperative style.
We found MicroProfile a promising option based on the above; not only on what it provides but the comparison between need vs overall cost. The most important driving factor is the nature of the application (a simple microservice), the end goal, and its enriched testability along with minimal development effort which made MicroProfile the best-suited.
In January 2021, this capability was rolled out to production successfully after going through multiple rounds of intensive testing along with the other integrations.
By the end of this series, we will try to cover different aspects of this application and will build this application from a clean state. To get all our ducks in a row, I divided this into the following sections:
- Getting the development environment ready by having all components from different layers in place with the help of a sample starter project.
- Adding core functionality to the project.
- Improving the testing aspect by adding integration tests using test containers.
- Introducing portability using containerization.
Before say that point 3 should have been moved to point 2, yes, I agree. In this instance, it was done intentionally to avoid touching another aspect of a practice that, in reality, requires a mindset reboot. We will not focus on that in this series. In this post, we will cover Point 1.
What is MicroProfile
There was a time when the whole industry, as one voice, started appreciating microservices and a trend began, applying 12 factors (find these on https://12factor.net/), creating cloud-ready applications and migrations to the cloud. During this time, a lot of technologies changed at a high pace to accommodate the needs and requirements of this new cloud space. Some industry experts, who observed the JAVA EE space, we’re a bit behind in this race and it was an alarming sign.
On June 27, 2016, in presence of some independent java champions and some companies (IBM, Red Hat, Payara, Tomitribe, and LJC), a collaborative decision was made to introduce a new subgroup of specification (and their implementations) optimized for microservice development and it was named as MicroProfile. The first version i.e. MicroProfile 1.0 consisted of JAX-RS 2.0, CDI 1.2, and JSON-P 1.0, because these were considered essential for a microservice and all of these were Java EE 7 specifications.
Motivation
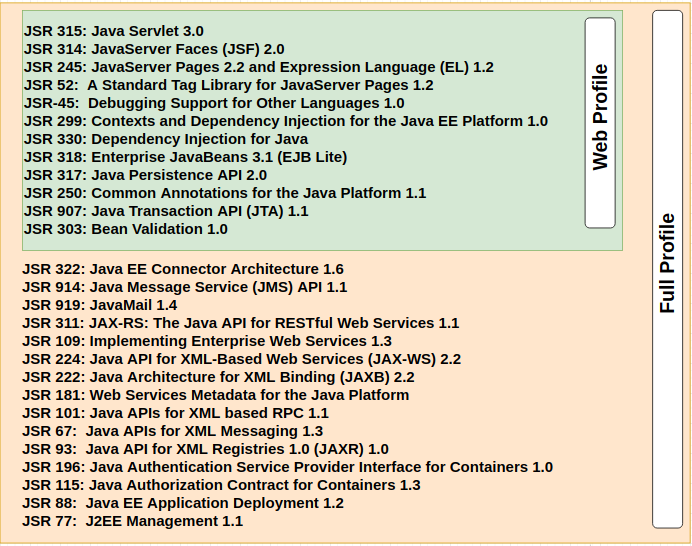
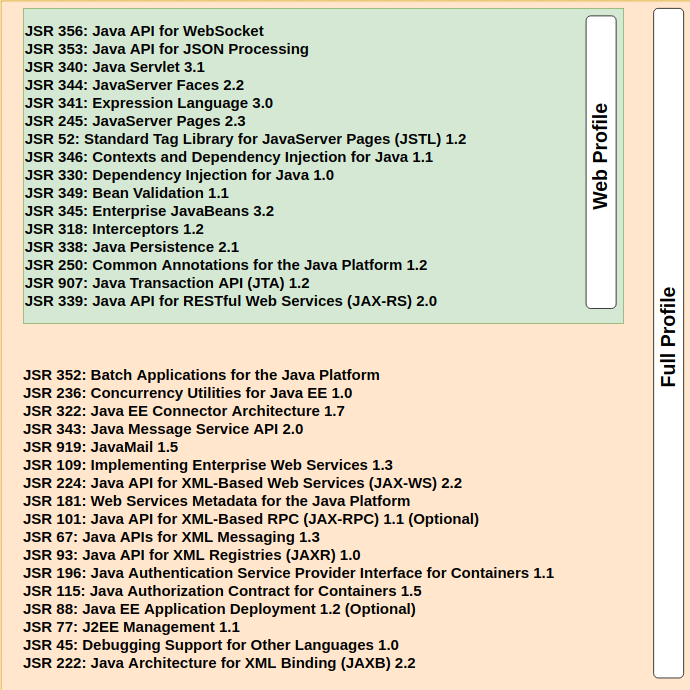
In Dec 2009, Java EE 6 introduced the concept of profiles. A profile is a collection of Java EE technologies and APIs that address specific developer communities and application types. The following profiles are implemented through the distributions of Sun GlassFish Enterprise Server v3.
Full Platform Profile
This profile is designed for developers who require the full set of Java EE APIs for enterprise application development. The Full Platform Profile is installed when you install Sun GlassFish Enterprise Server v3. This profile is also installed as part of the Java EE 6 SDK installation.
Web Profile
This profile contains web technologies that are part of the full platform and is designed for developers who do not require the full set of Java EE APIs. The Web Profile is installed when you install Sun GlassFish Enterprise Server v3 Web Profile. It is also installed with Java EE 6 Web Profile SDK.
Back then, the below was the classification:
By the time MicroProfile was introduced in 2016, the picture changed a bit as Java EE 7 was already released and some specs were added and upgraded as below:
And then a new specification named MicroProfile was born (or you can say a new subset was standardised).
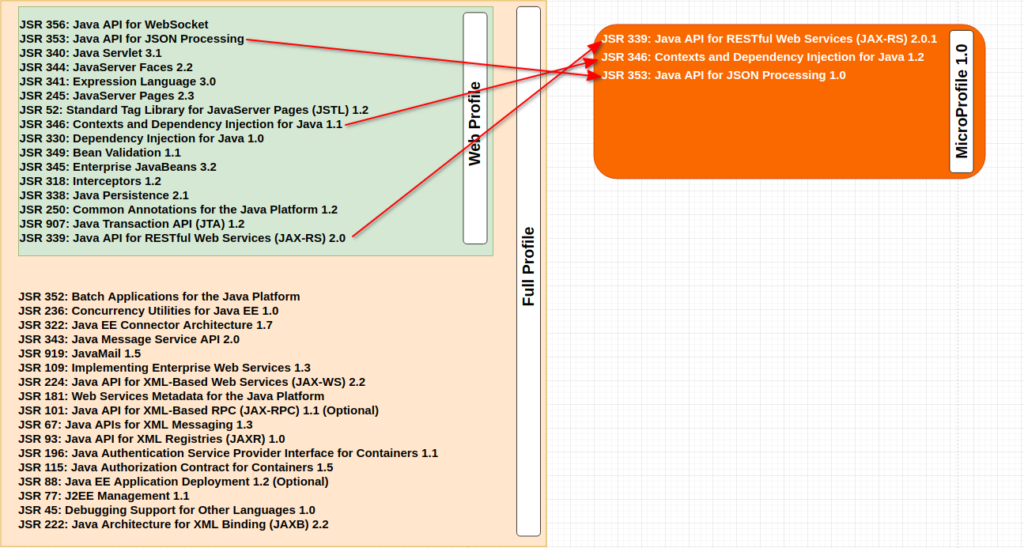
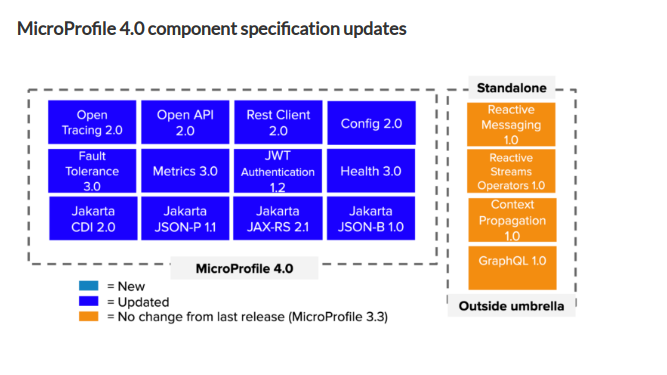
One thing to note was that at this point no new specification was created, but was used from already existing specifications from Java EE 7 or more precisely from the Web Profile sub-set. Later, with newer versions, new MicroProfile ones were created and added to the umbrella specification (MicroProfile), for more information please refer here. At the time of writing this post, MicroProfile 4.0 is going to be officially released soon.
Exciting isn’t it? 😍
Note: For some readers, if it’s confusing to choose between MicroProfile and SpringBoot, I would recommend you to go through a great blog here and then rethink what is most suited for your needs. To be honest, both offer a lot, however, the important part is to choose what your application needs are.
Enough talk, let’s move to the developer’s favorite part, … coding 🙂
Ok, so we have answers to what we eventually want to achieve with the system, what framework we want to use, and what tools and specs we have to help us to achieve the end goal. In this application, we would make use of 4 MicroProfile specifications and others from Jakarta EE 8. Let’s start with the tech stack we will be using here.
Technologies & Specifications
Language: Java 1.8
Runtime Spec: Jakarta EE 8
Runtime: IBM Websphere Liberty 20.0.0.6
Build tool: Maven 3+
Containerization: Docker (latest)
MicroProfile: 3.3 (currently the latest, but we will cherry-pick the specific ones we need)
Keycloak: In the containerized form
PostgreSQL: In the containerized form
What, are you serious? Are you for real? If at this point, these are your reactions (for the java version used :)) I can understand them, but let me explain. We had environmental limitations and had to go with this version. Soon it will be addressed and we will come out of an old era. Hopefully 😊.
Getting environment ready
We will be doing the following for that:
- Database: Start PostgreSQL container and execute the DDL Scrips
- Keycloak: Start Keycloak container and create the realm as per the shared configs
- Starter project: Download a MicroProfile starter project from here
- Verification: Test the token verification through sample secured resource comes with the starter project.
-
Database
Run the following command from the terminal. It would create a PostgreSQL database, use any database manager of your choice to access the database. Once it’s ready and you can access it, execute the shared script to create the arbitrary database objects.
docker run –rm \
–name pg \
-e POSTGRES_PASSWORD=password \
-e POSTGRES_DB=MRT_CONSENT \
-d -p 5432:5432 \
postgres
-
Keycloak
Save the config file locally and run the following command from the terminal. It would start keycloak container. Once the command completes successfully, access the URL and login with the credential as “admin:admin”.
docker run –rm \
-p 8080:8080 \
-p 8443:8443 \
-e KEYCLOAK_USER=admin \
-e KEYCLOAK_PASSWORD=admin \
quay.io/keycloak/keycloak:12.0.4
Once logged in, hover on “Master” and click on “Add realm”
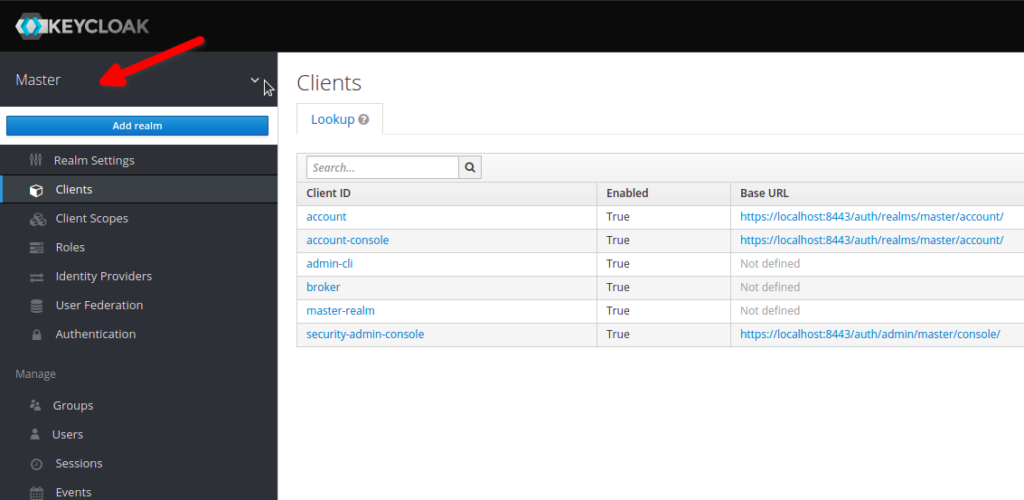
Select the locally saved config file and click on create, it will create a realm (test), a client (test), with 2 optional scopes (consent and consent-admin).
Now select the test realm, click on “Clients” from the left pane, click on client ID “test”, select the tab “Credentials” and click on “Regenerate Secret”, keep it safe, we would need this to get access token for this client.
In these next steps, we set up a client with a service account and grant type as “Confidential”, as we would only make use of client authentication, not users. If these sound unfamiliar, please refer to some resources about OAUTH 2 on the internet or check Keycloak documentation here.
Verify if you can get the access token by executing the following curl.
curl –location –request POST ‘https://localhost:8443/auth/realms/test/protocol/openid-connect/token’ \
–header ‘Content-Type: application/x-www-form-urlencoded’ \
–data-urlencode ‘client_id=test’ \
–data-urlencode ‘grant_type=client_credentials’ \
–data-urlencode ‘client_secret=<secret-value-copied-in-previous-step>’ \
–data-urlencode ‘scope=consent’ \
-
Starter project
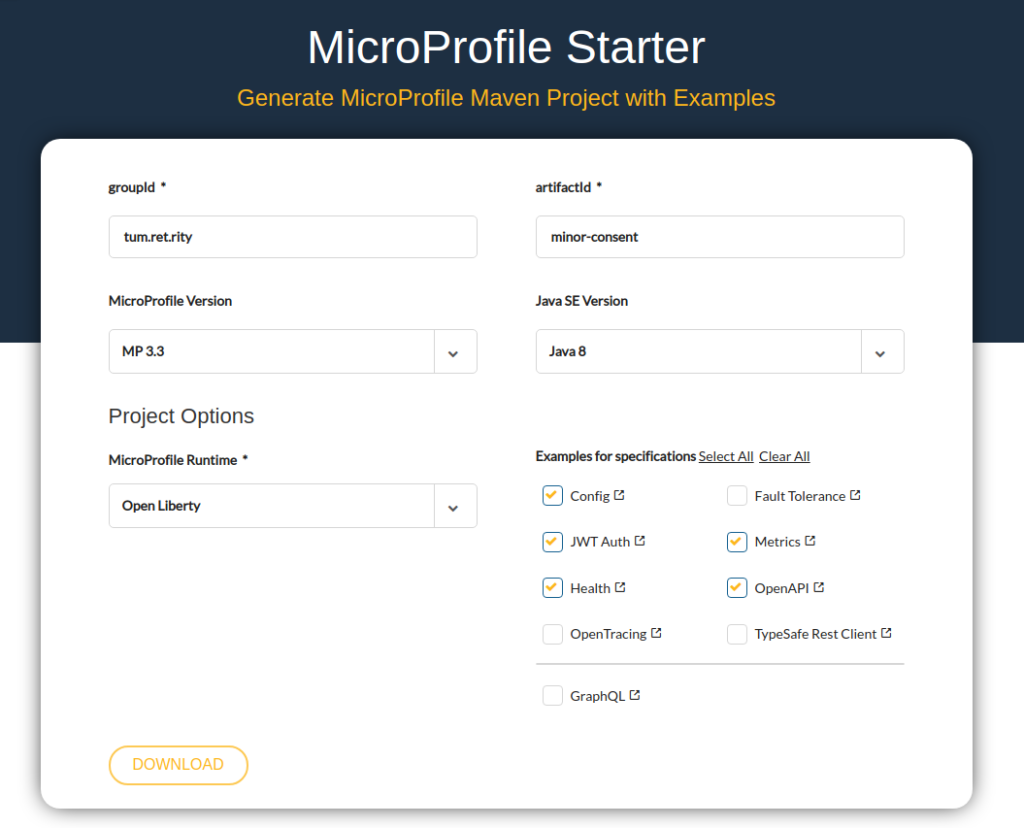
Go to this URL to choose the options as displayed in the image below and download the compressed file. Unzip it in your choice of location.
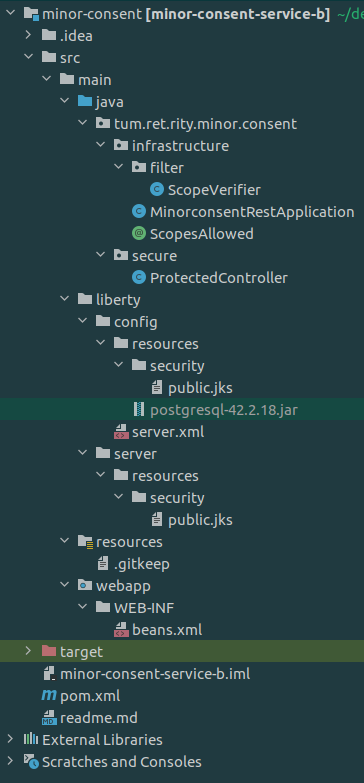
The starter project contains 2 parts: service-a and service-b. For simplicity’s sake, we would clean this up, and would start from a clean slate. To do that, take the folder (minor-consent), remove service-a from it and move the content of service-b folder to the parent folder, and then delete the empty folder (service-b). Now we would have a top-level folder as minor-consent and inside that a folder src and two files (pom.xml & readme.md). As our requirement is slightly different and we have to implement RBAC security based on scopes (a claim in token) not on the role, so we would be handling this explicitly, but would still let MicroProfile authenticate the token and roles verification.
As the first step, just copy the PostgreSQL driver from here to src/main/liberty/config/resources/. We would need this to connect to the database later.
pom.xml
Let’s make the following changes:
- Remove the jaeger-client and slf4j-jdk14 dependencies
- Add commons-lang3 as a compile dependency
- Update the bootstrapProperties in liberty-maven-plugin
<bootstrapProperties>
<server.httpPort>9082</server.httpPort>
<server.httpsPort>9445</server.httpsPort>
<contextRoot>${project.artifactId}</contextRoot>
<appLocation>${project.build.directory}/${project.build.finalName}.${project.packaging}</appLocation>
<project.name>${final.name}</project.name>
<jwt.jwksUri>https://localhost:8443/auth/realms/test/protocol/openid-connect/certs</jwt.jwksUri>
<jwt.issuer>https://localhost:8443/auth/realms/test</jwt.issuer>
<jwt.audiences>account</jwt.audiences>
<jwt.userNameAttribute>sub</jwt.userNameAttribute>
</bootstrapProperties>
The above properties configure the dynamic local liberty server
server.xml
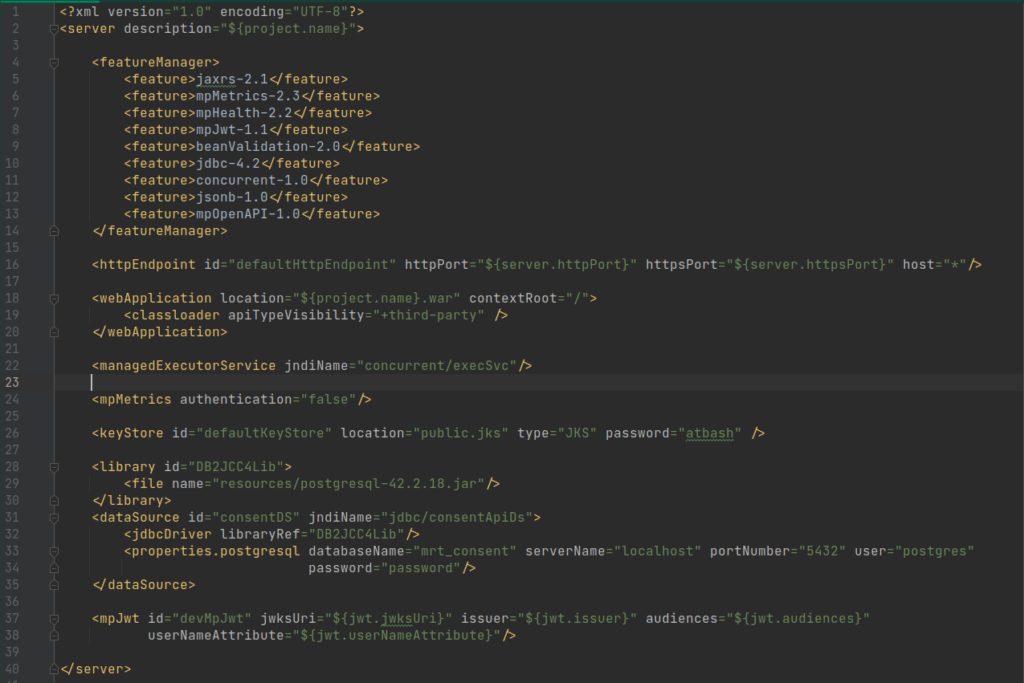
Required feature, needs, and motivation (line no 4 – 14)
- jaxrs-2.1: require to expose this as a REST service so that other services can consume
- mpMetrics-2.3: required to expose metrics for monitoring purpose
- mpHealth-2.2: required to expose the health endpoints for a quick health check
- mpJwt-1.1: required to handle security aspects like RBAC & token verification
- beanValidation-2.0: required for input validations
- jdbc-4.2: required for communication with EIS layer
- concurrent-1.0: required for taking help from runtime to manage threads and provide executor
- jsonb-1.0: required for some customization during serialization and deserialization phases
- mpOpenAPI-1.0: required for API contract generation\hosting
Note: We didn’t mention some features (cdi, jndi, mpConfig and jsonp) explicitly because of the transitive nature of runtime features that would be installed as dependencies.
Line no 16: Defines host and port for the application.
Line no (18 – 20): Defines the location and context root for the artifact.
Line no 22: Defines an injectable executer for thread management.
Line no 24: Disables authentication for metrics endpoints.
Line no 26: Defines the Keystore for runtime.
Line no (28 – 30): Defines the location of the database driver.
Line no (31 – 35): Defines the database connection properties.
Line no (37 – 38): Defines the JWT configurations, for token verification.
MinorconsentRestApplication

Line no 11, we updated the realmName as per our Keycloak configuration
ProtectedController
We made some small changes here; @Produce at class provides a response in JSON media type, the custom annotation @ScopesAllowed restricts the allowed scopes. These changes now restrict this method to be only accessible by a client with a valid token and have consent-admin scope.

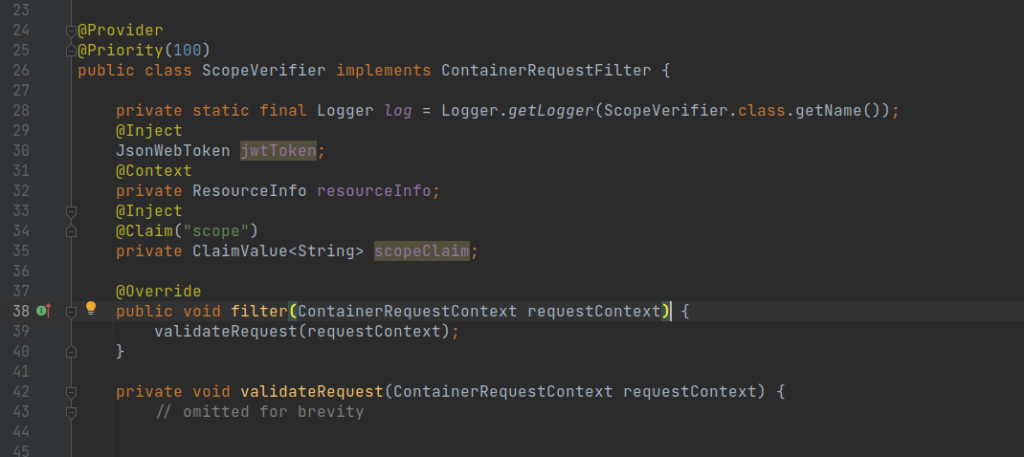
Scope verification
For our explicit implementation for scope verification, added a filter (ScopeVerifier) of type ContainerRequestFilter, requests would be intercepted conditionally based on the existence of an annotation (ScopesAllowed).
We also did some reshuffling of the things as below:
Running the application
Before we test this with our Keycloak token, we would need to do one more step and that is to import the Keycloak certificate in Liberty Keystore so that the liberty server can access jwksUri for token validation. You can check in server.xml (line no 26), the default password for liberty Keystore is atbash, download and save the Keycloak certificate from URL and add it to this store using key-tool or Keystore explorer, I found it really handy. Check it out here
Run the application by running the below command, notice the terminal output for all the endpoints exposed by the liberty server.
mvn clean liberty:run OR mvn clean liberty:dev
The difference between the above two commands is the first one starts up the server in normal mode, but the other one starts the server in dev mode, with the hot code replacement while running the server and you can check all your changes taking effect immediately.
You’re all set now to test the first integration. Use the curl mentioned above and generate the access token. Append “Bearer ” to the start of token and use that as Authorization header value while accessing the endpoint
The final working code discussed in this post can be found on GitHub on branch post-1, checkout using the below command:
git clone -b post-1 [email protected]:manish2aug/minor-consent.git
This concludes the first part of this blog post, in this blog we set up the environment and covered one MicroProfile specification (mpJwt), in the next and last part of this blog (Microprofile, a knight or just another pawn [Part 2 of 2]) we will see how to make use of other MicroProfile specifications.
Notes from the Editor:
[MP Blog] MicroProfile, a night or just another pawn #475 git issue